Podcast: Play in new window | Download
Subscribe: Apple Podcasts | RSS
This week I will share a training session that will help your players make the connection between the work you do on possession in practice to the way they function within a team shape in the match.
But first….
Congratulations to Sporting Kansas City for winning the 2015 Lamar Hunt Open Cup! As a coach with a Sporting KC Affiliate Club I’ve been fortunate to work with the first team staff on ways that we can help develop more homegrown players like Kevin Ellis, Erik Palmer-Brown and Jon Kempin.
Seth Sinovic and Matt Besler also grew up playing in Kansas City youth clubs before the MLS clubs started Academy systems.
Having five local boys in our team is a badge of honor to the clubs and coaches who work every day to develop young soccer players in Kansas City.
AND THEN….
Right before this episode goes live FC Kansas City wins the National Women’s Soccer League Championship for the second year in a row!
Position Specific Possession
Most possession games are set-up in a similar way: two teams of players and a couple of neutrals play keep away inside a square or rectangular space. This is a useful format for teaching the basic concepts of possession but it doesn’t relate clearly back to the game because the players are moving freely around the space with no defined shape or position. This is the opposite of the way they play in the game.
On match day they play in certain positions with defined roles and responsibilities. If we train them in a similar way to how they will play then we will have a greater chance of seeing the possession work we do on Wednesday showing up in the game on Sunday.
This training session progressively increases the pressure while making each activity relate as closely to the actual game as possible. You may choose to spend more time in one area or another depending on the age and skill level of your players. You may also do part of this session on one day and then come back the next day and do the remainder.
Training Session
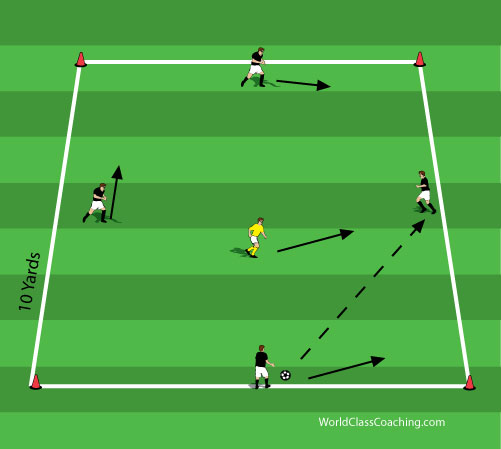
Diamond Passing
Starting with this as a technical warm-up will give you the opportunity to focus on the key factors involved in effective possession:
- Quality of the pass
- Body shape
- Movement
At the same time you can relate the shape of the players to positions on the field. The player at the bottom of the diamond could be a defender. The wide players are midfielders. The player at the top of the diamond is the forward.
This will help the players begin to visualize how this activity relates to the game. It will also be the framework used in each of the following activities.
4 v 1
We have basically just added a defender to the diamond passing exercise. Since the location of the pressure will be moving we have to train the players to support the ball in more specific ways.
Key Points
- Be sure the player with the ball has support on the right, left and a split (or through ball)
- The closer the pressure is the ‘sharper’ you have to make your angle
- Be on the shoulder of the pressuring player
- Anticipate the pass so that you can move to support it
This is a great first step for young players and one that you might skip with older, more experienced teams.
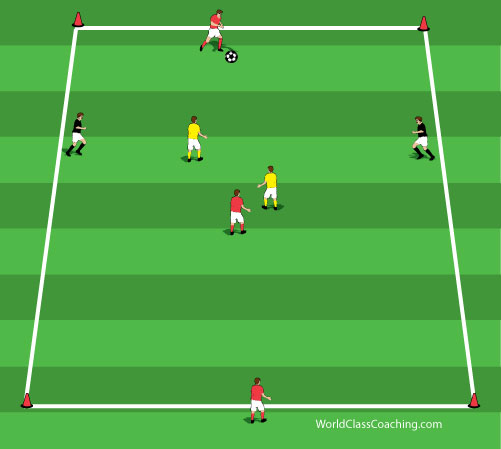
2 v 2 + 3
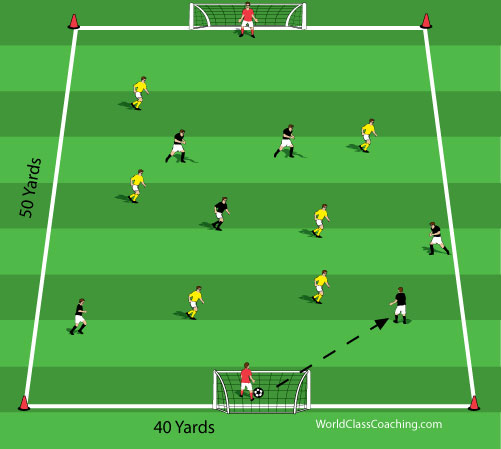
This is essentially a 5 v 2 game like the ones I discussed in Episode 6 but we retain the diamond shape that are so easily related to the positions on the field. We’re adding more pressure but giving the attacking team a target to play to that will release that pressure by moving the ball into space.
So now we have the two wide midfield players (Black) opening up wide for the defensive center mid (Red with the ball) with the attacking center midfielder (Red in the middle) showing for a split. All with the goal of passing to the forward on the other end (Red on the far end).
When the Yellow team win the ball they pass it to a neutral player on the end and open up to spread the field and create the attacking shape.
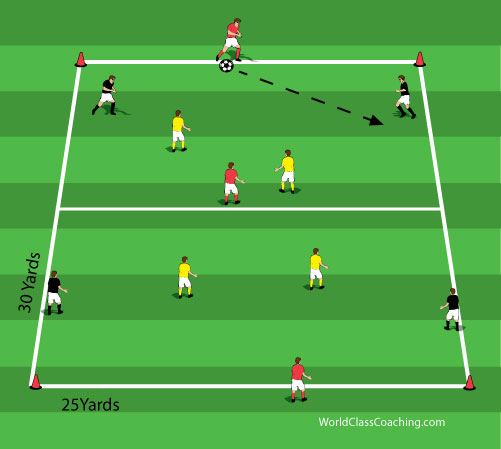
4 v 4 + 3
This is a progression of the previous exercise which adds more pressure and complexity. At first I keep restrict the players to operate in only one half of the field. The central Red Neutral is the only players allowed to move between the halves. As the players improve I grant them free movement anywhere in the area.
This can be a great warm-up activity before a game because it can include all 11 starting players. The players can start to think of their shape and responsibilities while working to link passes and keep possession.
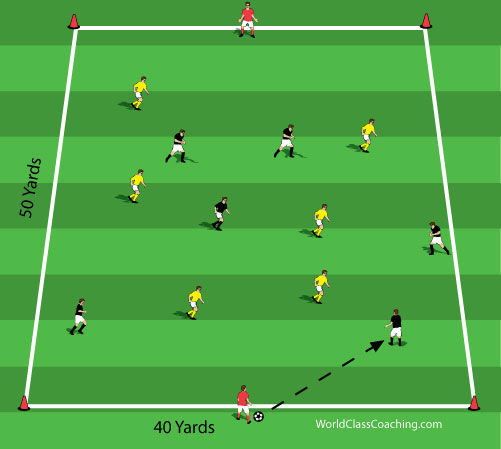
Directional Possession
I want the players to define their shape before the start of this game so that they continue to see how they can possess and move the ball relative to their position on the field.
Possession games to targets keep the focus on moving the ball and linking up rather than focusing on scoring the goal. I feel that this is an important step to take before moving to a full match situation.
Small-Sided Game
Ending the session with a match will let you gage the level of understand your players have gained from the training session. It also allows you to use the coaching points from the previous activities in a game environment like you will in the weekend match. This is even more helpful in making the connection from the training session to the game.
If you’ve struggled to see a transfer of training with other possession activities you’ve used with your teams I would encourage you to present this session to your team a couple of times. I’m sure they will have a greater understanding of how you want them to maintain possession with a purpose in your next game.
If you’re interested in more ideas on possession play I would encourage you to check out, ‘Coaching Possession with a Purpose Vol 1 & 2’. These excellent books by Jonny Cater and Michael J Louter outline the important concepts of possession and provide complete training sessions that you can use with your own teams.
Each training session includes a, ‘Print and Play’ page that allows you to print that page and have everything you need to run the session including the diagrams and descriptions of each activity.
Click Here to get a copy for yourself.
Printable Show Notes
The show notes for each episode are accessed through the WCC Training Center.
They are FREE but you will need at least a Free Membership to the Training Center in order to view and print them.
Click on the image of the notes and if you’re already logged in to the Training Center you’ll be taken to the Podcast page. If you’re not logged in your be taken to a login page where you’ll also be able to login or register if you are not already a Member.
Remember!
Make sure you subscribe to Coaching Soccer Weekly through iTunes, or your podcast provider of choice, to be sure you never miss an episode.
Please take a moment while you’re on iTunes and give us a ranking and a review. This will help bring our podcast to the attention of more coaches and spread the word about the ideas and training sessions that we’re sharing.
In the Next Episode
Tomorrow I’m talking with Bob Warming, Head Men’s Coach at Penn State University about how to help your players translate the technical training that you do with them into more effective team play in your next game.



I typically use this type of progression to teach possession. One problem I have with younger players especially is that any time you put a cone on the ground, they want to stand on or behind it. If we do the diamond passing warmup, most kids don’t think of themselves as moving around a diamond but moving around a square. When we then move to the 4v1 within the square, they tend to get stuck in the corners of the grid ( a square formation) instead of moving along the sides of the grid (a diamond formation).
Perhaps if we did the initial warmup by making a square with big cones and then creating a diamond within it using small cones and having them pass around the diamond. It would give them visual clues about moving at angles within the square. I have not tried this as it just occurred to me while reading this article.
Any thoughts?
Dave,
At the beginning of each exercise I tell them what the cone is for. In the diamond passing I explain that it’s a defender that they will check away from and play around. In the 4v1 I explain that the cones define the area and they should play on the sides of the area and not get stuck in the corners. I might have to remind a couple of them the next time we do it but that’s all.
I’ve started using The Training Triangles from Episode 6 in my exercises to represent players as often as possible. They take up the space that a player would and then I can use cones only to define the area.
I like your idea of using the different cones. Then they could just stay in the same area and see the connection between the two exercises more easily.
Tom
I agree
I like the podcast. By applying it with my female team i realise that they are taking it must like fun. It brought more fast game and the rational space occupation in the team. Through it we won our last away match easly. Thanks a lot.
Tom.. Good afternoon.
Could you please clarify “be on the shoulder on the pressuring player”
Thanks and keep up the good work.
Hey Dave,
What I mean is that the wall passer needs to stay even with the pressuring defender. Often times the wall passer will take up a position but as the defender moves the wall passer needs to stay in line with him to create a good angle for the give-and-go. I describe this as, ‘staying on his shoulder’.
Let me know if you have any other questions.
Thanks for the follow-up Tom!